|
The preparation of cricket pitches is considered to be the final
task in preparing the pitch for actual play. Prior to commencing
further, one important thing that needs to be pointed out is there
has been many successful methods used to prepare cricket wicket
spanning over many decades and when it comes to preparing wickets
there is no one preparation method that is suitable for everyone.
Its been proven over time that the two most decisive factors
in pitch preparation are before rolling commences and they are
soil moisture levels and grass cover.
Grass Cover
Prior to the preparation of a wicket commencing it is crucial
that the wicket has 100% grass coverage. The reasons for this
are as follows
- Presentation
- Root system
- Even drying
- Even playability
- Improved recovery after preparation
Soil Moisture levels
It is crucial that soil moisture is consistent and even through
the soil/clay profile prior to rolling commencing. All soils reach
a maximum compaction at a certain moisture level, however, each
soil has a different moisture level that maximum compaction occurs,
this largely depends on the makeup of the soil and the clay content
of the soil. However, as a general rule, it is at field capacity
that each soil can be rolled and compacted to its maximum bulk
density. The key factors in bringing a soil to field capacity
is;
- Slow deep water
- Consistent application of water across the wicket
- Slow precipitation of water
- Frequent light watering over a period of days
- Use of wetting agents to increase water uniformity
- Allowing the wicket time for the surface to dry before rolling
commences
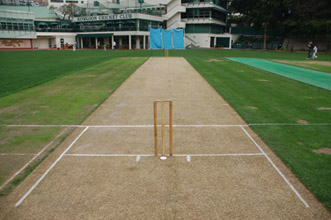
Once the initial watering is completed, then final checks to
the pitch should be undertaken to ensure it is 'ready for rolling'
they are as follows;
- Deep even moisture level to 100mm deep
- Balance of air and moisture with the 100mm profile
- A root system 100mm deep at least
- Pliable profile
- Plastic profile
- Firm, but moist
- Soil to be considered "ideal for molding"
- Meet the steel peg test (feel firmer the further a peg is
pushed into the pitch profile)
| Once the ready for rolling criteria has been met, rolling
can commence. Every soil/clay has a different requirement
when it comes to roller weights - maximam compaction will
be achieved on a cricket pitch soil when it is at the ideal
moisture content and rolled with the right weight roller,
as mentioned above the ideal moisture content varies depending
on the soil/clay type, however, the same applies to the ideal
roller weight. Based on this, the following information is
a guide only. |
|
- Maximum compaction of a cricket pitch can be achieved between
4 - 6 hours of rolling using a one weight roller during preparation.
Using the right weight roller is the same as or better than
using two weight rollers during preparation.
- Rolling the pitch on different angles (longitude, cross,
and diagonal) maximizes the effect of the rolling time and helps
to 'bind' the pitch together and keep it flat
- Always roll as slow as possible to maximize the effect of
the rolling time
- The roller's effect is lesser on the profile, the deeper
the profile is i.e. is max effect is with in the surface and
lesser at depth.
- Rolling will only effect a pitch surface will it is in a
pliable/plasticine state - dry rolling of a pitch is worthless
and will only damage the surface and the grass
- Rolling plays a important role in compacting/preparing the
pitch, however, rolling can only bring a pitch to a certain
level of compaction - natural drying takes it the rest of the
way
Once the maximum compaction has been achieved through rolling,
the drying phase of the pitch preparation should commence, it
should be understood that the drying phase is as important as
the rolling during the preparation stage. Basically, the pitch
is watered to field capacity to allow the pitch soil profile to
be 'squeezed' together through rolling which increases the bulk
density to a certain point, and the drying phase takes the bulk
density of the pitch up to the desired levels to achieved the
ideal playing characteristics.
Depending on drying conditions, the drying process of the pitch
should take between 6 - 10 days, possibly less in hot conditions.
The drying of the pitch is achieved through direct evaporation
from the soil and evapotraspiratiom by which the root system of
the grass 'sucks' the excess soil moisture out of the profile.
In other words drying the pitch can be looked at in two ways;
a) Drying the top 30mm - evaporation
b) Drying the rest of the profile (around 100mm) - evapo-transpiration
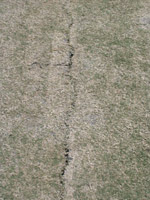
During the drying phase of the preparation most pitch soils crack
(extract) during the drying phase. This is not considered a bad
thing or unusual, it just needs to be monitored and controlled.
Cracking needs to be controlled during these stages to ensure
the surface keeps it's integrity. Cracking will only become a
problem and provide uneven bounce when;
A) The cracks become unstable i.e. they move when pressed upon
or when the roller goes over the pitch
B) When they become uneven i.e. one side of the crack raises above
the other side of the crack, and they are no longer flat
In both these instances a prepared pitch will provide uneven
bounce when being played on.
 |
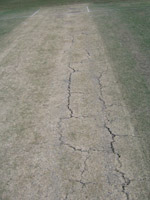
The control of cracking to ensure that the
cracks don't get too excessive is important. This is done
by the timely application of hand water and should be applied
to the prepared wicket on a required basis to prevent the
cracks from getting too wide and/or unstable. The covering
of prepared pitches to prevent cracking with a thick hession
mat is also an option - this is effective by preventing the
pitch from further moisture losses, therefore not cracking
as excessively. |
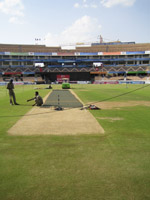
During the drying stages of the pitch preparation, It is important
to keep the grass alive and active for transpiration. Grass left
on the pitch will result in it playing faster than a pitch without
grass. Grass acts as a 'lubricant' for the ball to 'skid' off
the surface and go through to the keeper more quickly. The grass
on a pitch during the drying phase must be active in order to
dry out the base of a wicket - dead/dormant grass leaves amounts
to no evapotransporation, leading to no drying of the base - leads
to a slow pitch. Anytime that the grass is killed/damaged evapo-transpiration
will either stop or slow dramatically resulting in the base staying
damp, therefore producing low, slow conditions. Grass removal
just before match day comes down to personal preference, remember
that just because a pitch has grass on it, does not mean it will
seam around. Only remove grass if absolutely necessary. Grass
cover will give pace and bounce to the pitch.
|